Input
Within the Input tab, you can visualize and edit the input file required for starting a simulation. Both ASCII and XML format are supported.The input file specifies all information required for the simulation tool. E.g. the material, the structure, which types of caluclations and boundaries, which output files and their format…
The syntax and the supported features depend on the tool used for calculations. For detailed information see related documentation:
General features of the Input tab
Autocomplete
Context-sensitive online help
Editing
Multiple input tabs
Printing
Search in File
Syntax highlighting
Use of variables
Example and New Input Files
Each installation of the nextnano software comes with an extensive set of example input files for each nextnano tool of that installed package. In most cases these example input files are used to learn about the software and the syntax. Small adjustments to the example files will suffice to adapt them to your simulation requirements and device’s structure. The structure definition and material database offer high flexiblilty and customization options and will certainly cover your desired device.
Instead of adapting an example input file, advanced users can write their file from scratch, generate it with nextnanopy or use our set of template input files.
Create new Input File with predefined Structure
By using our set of template input files, a new and clean input file will be created - with a simple predefined structure. This is the perfect starting point for a highly customized input file for setting up the simulation twin of your device and research. The basic structure of the template input file contains all required blocks for the simulation, but no additional details like our example input files do. So adjustments will be easier. An Example is shown in Figure 1.1.2. When creating such a new file you can select the nextnano tool, the crystal structure and the dimensionality of your new simulation, see Figure 1.1.1.
Note
The template input files are searched for in a directory relative to the executable of the defined nextnano tool. Thus, this feature only works if the paths to the executables are specified within Tools - Options. This way the syntax of the newly created input file is up to date with the executable version used for the simulation.

Figure 1.1.1 Dialog for the selection of the input file type and requirements.

Figure 1.1.2 Newly created Input file with a pedefined structure for the chosen input file type and requirements. In this example a nextnano++ input file for a 2D simulation of a zincblende material.
Autocomplete feature
By using the key combination ‘ctrl’ plus ‘space’ the autocomplete menu will pop up. It will show available keywords for the current section as well as the names of defined variables.
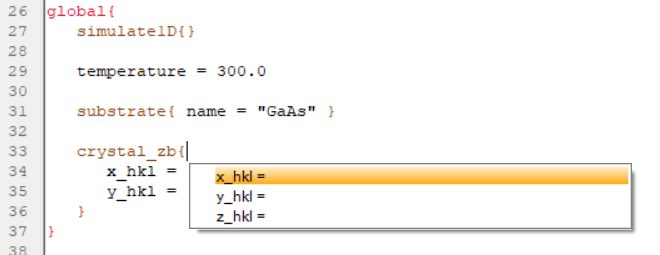
Figure 1.1.3 The nextnanomat autocomplete menu.
Last update: 2025/07/09